
In a previous article, published in the March 2010 MJSA Journal, I recommended the use of a mock-up during the design and production planning process. In this article I'll illustrate my personal methods and trace my progress from client interview, through establishing design goals and production planning, to construction of the final ring.
Interview Client(s)
My clients were a mature professional couple who had acquired a rectangular mixed cut pink sapphire in celebration of their engagement and wanted it mounted in a ring. She also had several pieces of jewelry she didn't wear any longer containing a variety of round brilliant diamond melee, as well as an estate piece containing two pair of baguettes. Unfortunately, one of the larger baguettes in the estate piece had been broken requiring me to source a match, but other than sorting, grading and selecting the melee, that was the extent of my gemstone involvement. I suppose this could be seen as a rather extreme exercise in re-purposing.
The Gemstone layout:

Since nearly anything is possible in a custom piece, one of the most daunting tasks of the custom jeweler is to narrow down the possibilities.
My usual interview consists of showing the client a variety of finished jewelry pieces and loose gemstones I have in stock, a tour of one of my portfolios consisting of photographs from a selection of past commissions, and often a purview of my design album containing pencil and gouache renderings. I intentionally include images and pieces that have no relation to what they are looking for, a grand assortment as it were. What I'm interested in is how they respond to various pieces, and the colors, textures, shapes, forms and scale of the jewelry, they see. I listen for 'oohs', 'ahhs' and 'ughs', and take mental notes to create a picture of what they are attracted to, or not.
I also pay attention to the conversation they are having with each other, the dynamic between them and with me, as well as attitudes and expression through body language. This being a ring commission, I pay special attention to the shape of the hand and fingers and how they are held and used in conversation. I also pay attention to how the person holds themselves, and try to ascertain their character and bearing, confidence, playfulness and so forth.
For their part, my clients had very helpfully saved images of rings they liked and disliked from magazines, mailers and so on, and she also brought in several rings and earrings that were her favorites. The collection of images and jewelry gave me a clear idea of their taste and preference, and while interviewing them I was able to address issues of scale, texture, choice of metal and stone setting preferences.
By the end of the interview I knew my clients wanted an airy, open construction, a ring that was not flamboyant but rather understated, the incorporation of multiple bands, and that they wanted me to avoid prong settings, to use some of the diamonds from their obsolete and estate pieces, and to have the piece constructed in platinum.
After meeting with them I went through a series of pencil concept sketches and notes, divested the estate and obsolete jewelry of their gems, and started sorting the assembled material. I love the puzzle of finding out how to direct all the frenetic gems skittering around on my gem pad to form a unified whole that will drape the finger beautifully and comfortably, grace the wearer, and withstand the perils that a ring must endure - all the while satisfy my needs as a jeweler to create something fresh in design, challenging to make, and to (hopefully) exceed my customers expectations.
Establish Design Goals
A myriad of large and small decisions are made throughout the planning and production of a piece of jewelry, some are carefully and formally considered, while others are arrived at intuitively or instinctively. Observations made and conversations had while making the piece lead to a fuller understanding of the piece as a sculptural object, and create a positive feedback loop with the processes and procedures involved, thereby informing and greatly enhancing the end result.
Establishing design goals is a process that starts with the client interview and never really ends. Although 'establishing' may sound like a rather fixed term, the process is in fact fluid, and continual. It's a bit more like describing a trajectory toward a target, rather than pouring a foundation on which to build. No matter what step in the process I am in, I am always cognizant of the piece's trajectory toward that goal.
From a design point of view, I was looking for a grouping of stones whose layout would create a series of forms and shapes that would reinforce one another as well as create visual texture and interest between the glassiness of the center-stone and baguettes, and that of the pointillist busyness of the diamond melee sides. I wanted a ring with crisp geometry and sweeping sensuous lines. I also knew I wanted a piece that was restrained, sophisticated, calm, and devoid of superfluous frills.
I find it's helpful to have a dialogue with the ring as it's design begins to take shape, casting your hopes and expectations onto it, and listening as it patiently reminds you that what looks good on paper can often be awkward in reality, and of basic physics, such as that two objects cannot occupy the same space at the same time. Making a mock-up is indispensable in this regard, since those 'two objects in space' need to be very precisely positioned, and the way a line makes a turn around a corner has to make sense as well as resolve itself.
Make a Mock-Up
After narrowing design options based on the client's criteria and the materials at hand, I arrived at a few design suggestions that were then winnowed to create the final design. Once the design concept is arrived at I do a series of mock-ups in clay with the gemstones to resolve design issues such as proportion, topography, the placement and selection of stones, and to refine the layout of the gemstones.
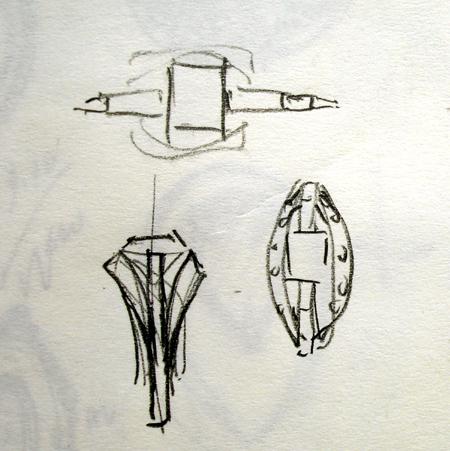
The design concept sketch, usually about as far as Igo with a 2D drawing before sketching in 3D.
The final 3D sketch, or mock-up
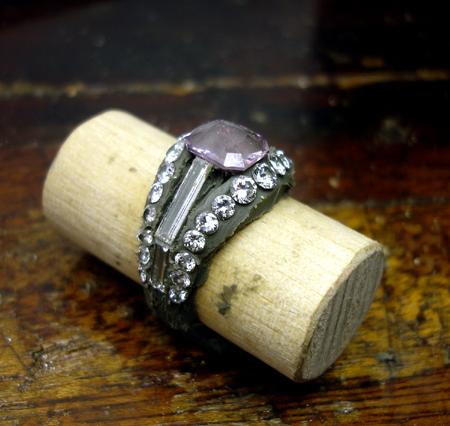
To open up the airiness of the ring, and to give the ring a feeling of expansion I raised the center-stone slightly bringing the baguettes up to meet the center-stone under it's girdle. This will also allow a nice play of figure/ground with the negative space created by framing the baguette-center-stone arrangement with the tapering melee side-bands. The open space created increases as it reaches the center-stone giving it a feeling of float and giving the center-stone a reason for being there.
I chose to bezel set the center-stone and baguette arrangement to reinforce the geometry of their shapes. By tapering the bezels to tuck under the stones the size of the negative space between the baguettes and the melee side-bands is increased, creates an interesting visual shift as the ring is rotated, and also helps to avoid a too-metallic appearance.
To create a continuous flow among the transparent glassy elements I would pierce the center-stone's bezel where it meets the baguettes. As a further enhancement to the textural contrast between the elements, I planned to bead set the melee side-bands while framing them with a distinct bright cut to reinforce their shape and taper. To soften the sides, and to help create an overall bombe' effect, I tilted the melee sides outward slightly, and increasingly, as they approached the rings top.
Planning a Production Strategy

At this point, with the mock-up as reference, I felt I was able to formulate a plan for construction. For reference I made a quick sketch of the parts to be fabricated that comprised the primary elements of the ring: the center-stone and baguette bezels, the side-stone melee-shank, and the gallery under-bezel.
My considerations for construction centered on the most efficient use of material and process to create the shapes and forms envisioned in the design. Although my primary love is fabricating directly in the metal of choice, with platinum approaching $1700 an ounce, I wasn't thrilled at the prospect of generating a lot of platinum filings and scrap. Since the melee side-bands (b) and the under-bezel (c) would generate the most filings and scrap, I determined to fabricate models of them and then cast in 950 platinum-ruthenium. A further efficiency of this process was that I could make one side-band model, and cast the two side-bands I needed. The bezels for the center-stone and baguettes (a) would be fabricated in 950 platinum-ruthenium ensuring strength, thinness and accuracy.

With design resolved, size and number of stones known and production methods decided, I was able to arrive at a cost estimate for construction. I produced a final pencil and gouache rendering and presented it along with the mock-up and estimate to my clients for their approval.
I was ready to begin… Prototyping
There are a number of methods, processes and materials with which to create a piece of jewelry, and a long list of tools to with which to execute them. The greater your understanding of the tools, materials and processes available the more opportunity you'll have to exploit them for their strengths, and avoid them for their weaknesses. We all have our favorites, and I find the crispness and certainty of fabricating in metal very satisfying, and for this project an appropriate choice.
My first challenge was to create a model of the curved, tapering, tilted and encircling outer side-bands that would be set with diamond melee. This is actually a rather complicated shape and it had to somehow end up with a feeling of casual graceful elegance. To prove and refine my technique, check my dimensions, and to get a feel for the ring, I played around a little and produced silver sketches of the side-bands, a collet to represent the ring's finger size, and rough bezels for the baguettes and sapphire center.
One of the most pleasurable aspects of building a piece of jewelry is that you are continually learning from the process as you create the forms and shapes that comprise it. This is the 'observation and conversation' I was speaking of when establishing design goals. When I feel like I'm having a conversation with the piece I know I'm on the right track, when I don't, I know I'm off and so to, will be the piece. It's critical to observe and listen as the piece takes shape, and to make adjustments to it's trajectory, in order to ensure you arrive at the right place.
Fabricating the Models


Thinking I was on the right track, I went about making the side-band model. I first cut a strip of silver the maximum width and thickness required, and then laid out the decreasing gemstone widths at specific distances from the center. I then filed a taper to these marks while holding it in a hand vise. (The silver strip was first coated with a broad nib magic marker so the scribe marks would be easily visible).


Deformation came next. I bent the tapered strip into a 'U' shape to the correct size on a ring mandrel and clamped it in a vise backed by a copper sheet to prevent marring as well as to produce a less abrupt bend. When it was positioned properly I dapped it at it's center with a hardwood dowel to produce the bend I desired.
In this way I was able to produce a complicated form by using the properties of the material as an asset. I had filed the taper, but the bend, the curve, and the tilt, all came with a few taps of a dowel. After bending the legs of the 'U' to the correct circumference on a ring mandrel, I had the band as well. Metal just wants to be your friend sometimes.
Fit and Mark the Under-Bezel.


The under-bezel and gallery was to extend to the ends of the baguettes, which was slightly more than half way around the ring. I fitted a blank for the under-bezel and then filed out the underside of the side-band to create a tapered, expanding airline.
Once fitted, the outside contour of the under-bezel was scribed using the side-band model as a guide, and then cut and filed to this line.
Layout Side-Band for Diamonds, and Cut the Ajoures


I prefer a small drafting divider, almost impossible to find these days, for layout because of their pinpoint accuracy and small, easy to balance, size.
Pierce the Under-Bezel Model


Scribe with dividers the areas to be pierced. I left a bridge in the center of the under-bezel to add support to the model to help avoid distortion when it was molded, waxed, and then cast. It was removed from the casting after the casting was cleaned and pre-polished.
While the models were being molded and cast, I would fabricate the bezels for the center-stone and the baguettes.
Fabricate Center-Stone Setting
Most precious gems are cut to preserve as much of the crystal as possible. They are seldom a 'standard' size or depth, and a setting must be fabricated to match its dimensions precisely. Furthermore, proportion between finger size and stone size, stone depth and it's positioning in relation to ancillary or side stones, often make the readymade or standard sized setting an inappropriate choice.


A flat wire was scored with a fine saw blade and then notched with a tri-square escapement file to make the center-stone bezel.


Check the angle of the facets of the bezel for uniformity with a bevel angle gauge.
After soldering all the joints with 1700 solder I began tapering the setting by cutting the joints from the underside with a fine saw blade. I cut at an angle to remove more metal on the inside of the bezel than on the outside, and about two thirds of the way down. I next bent in the facets equally, and repeated the saw cuts, but this time cut only a little over half way down. Repeat bending in the facets and cut down once more, but this time not even half way down. By going through this series of steps a very tight seam is made that, once soldered with 1700 solder, is difficult to see.


Fabrication of the baguette bezels was guided by the silver prototype and a drawn layout of the angles required.

Assembly and Setting of Melee
Following the cleaning and refining of the cast elements, a dry assembly of all component parts was performed to check fit. Measurements were then made for a lower shank spacer to fit between the side-bands at the bottom of the ring, and to end at the baguettes. I used a thin strip of platinum and curved it along it's length into a shallow 'C' shape by drawing it, backed by a wire, through a drawplate, then bending it to size on a ring mandrel, and finally filing it to fit.

The side-band ajoures, and all surfaces, were thoroughly polished before assembly of the side-bands and under-bezel. Bead setting of the diamond melee was done before the center-stone and baguette bezels were soldered in place to avoid interference. Following setting of the diamond melee a thorough polish was again performed before the baguette and center-stone bezels were soldered in place. When soldering with diamonds in place I double coat the diamonds with boric acid, warm up and cool down gradually, avoid drafts, and do not exceed 1100 platinum solder.
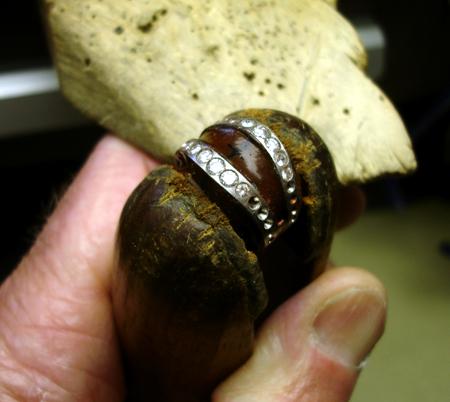
Set the baguettes and the center-stone, clean up, final polish, and I'm done.
On the underside, you can see how the split center-stone bezel and baguette bezels are reinforced with small platinum balls.


